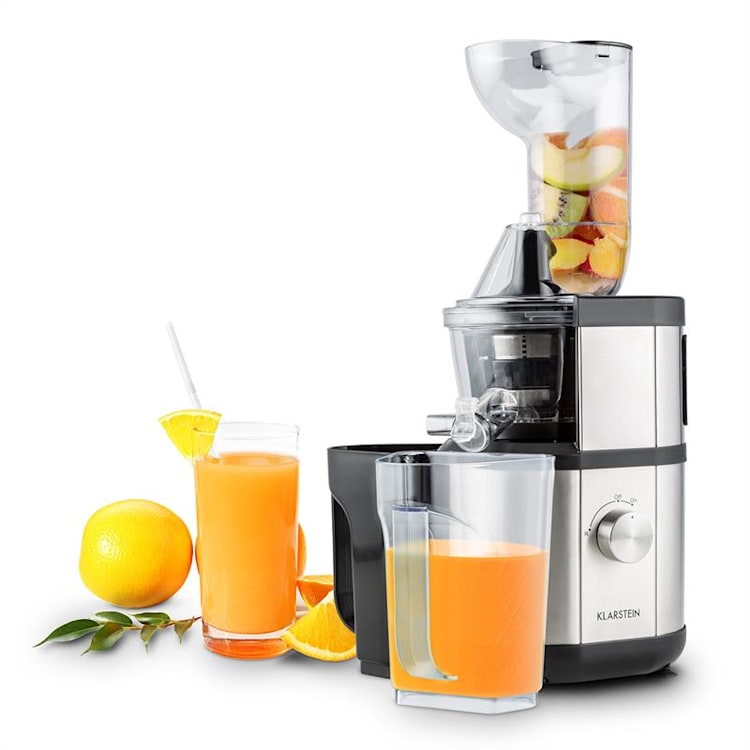
Ho testato la prima volta la centrifuga, non a caso, con le arance | Questo perchè con i tradizionali spremiagrumi si ha sempre la sensazione che non vengono spremuti perfettamente, lasciando ai bordi sempre molto succo che va a finire nella spazzatura.
Grazie a questa macchina però, riusciremo a ricavarne fino all' ultima goccia.
La macchina arriva a casa ben protetta, all' interno di una doppia scatola di cartone per evitarne ogni piccolo problema durante il trasporto.
Una volta aperta la confezione principale troviamo all' interno :
- 1 Spremiagrumi con tutti i suoi componenti
- 1 Vaschetta per la raccolta del succo trasparente
- 1 Vaschetta per la raccolta della polpa, in colorazione nera
- 1 Manuale di istruzioni ben dettagliato in molte lingue : ITALIANO , Tedesco, Inglese, Francese e Spagnolo
- 1 Spazzola per pulire a fondo gli spazi più difficili da raggiungere
Prima di assemblare la macchina è opportuno lavare i componenti in acqua calda con sapone ( che non contenga prodotti abrasivi ) utilizzando una spugna o panno morbido per evitare di graffiare i componenti.
Per una corretta installazione, dovremo far attenzione che i componenti siano inseriti nel verso giusto, incastrandoli perfettamente nella zona dedicata. I passaggi si effettuano dal basso verso l' alto, quindi come prima cosa dovremo montare il Bicchiere ( con le 2 uscite dedicate al succo ed alla polpa ) - Dentro ad esso dovremo inserire il supporto per il filtro - In seguito inseriamo il filtro ( e lo facciamo combaciare con una rotella presente nella base ) - A quel punto è il momento della Trivella ( un pò più complicata da inserire ) - Per concludere poggiamo l' imbuto e chiudiamo il tutto.
COME FUNZIONA :
Una volta che avremo effettuato i primi passaggi, ed avremo assemblato il tutto, saremo pronti per andare a centrifugare moltissimi tipi di frutta e verdura. Per far si che la macchina non subisca danni, o blocchi, dovremo togliere il nocciolo dalla frutta, la buccia dagli agrumi, dal melone, ananas e mango.
A questo punto, dopo un lavaggio accurato potremo andare a tagliare la frutta in piccoli pezzi, così da poterla inserire all' interno dell' imbuto senza problemi.
Adesso saremo pronti per azionare la macchina, ed inserendo all' interno la nostra frutta o verdura, in pochi secondi inizierà a scorrere il succo nella zona dedicata, mentre la polpa dall' altro.
COSA POSSIAMO CENTRIFUGARE :
Con questo tipo di macchina è possibile estrarre il succo da ogni tipo di frutta e verdura ( meglio se di stagione e che non contenga amido )
Possiamo infatti inserire all' interno anche : Sedano - Carote - Spinaci - Mele - Pere - Cetrioli - Pomodori - Banane ecc.
Per quanto riguarda gli ortaggi a foglia è consigliato mischiarli con altri prodotti che contengono maggior succo
PRO :
- E' perfetta per creare centrifugati in tutti i mesi dell' anno, per chi si allena, ha bisogno di energie durante la giornata, ha bisogno di vitamine, sarà la macchina ideale, una centrifuga la mattina a colazione darà sicuramente molte più energie che un succo di frutta al bar.
- Il montaggio dei componenti è semplicissimo e veloce, le prime volte risulterà un pò scomodo, ma una volta presa la mano sarà un attimo assemblarla
- A differenza di altre macchine simili, è possibile inserire quasi tutti i tipi di frutta e verdura, per creare mix veramente particolari di gusti mai provati prima.
- Ha un livello di sicurezza altissimo, se montata correttamente sarà impossibile inserire le mani all' interno ( compresi i bambini ) ed il motore non partirà fino a che non sarà chiusa perfettamente ogni singola parte.
- Estrae tutto il succo possibile, infatti la polpa risulta secca e priva di alcun liquido all' interno
- Gli " scarti " potremo utilizzarli per concimare le piante in terrazzo o giardino, così da non buttar via niente oltre alla buccia.
CONTRO :
- Non è un vero e proprio contro, ma ,essendo un pò troppo alta, in alcune cucine ( come la mia ) è difficile trovare un posto fi
I tested the centrifuge for the first time, not surprisingly, with oranges | This is because with traditional juicers you always have the feeling that they are not squeezed perfectly, always leaving a lot of juice at the edges which ends up in the trash. Thanks to this machine, however, we will be able to get every last drop out of it. The machine arrives home well protected, inside a double cardboard box to avoid any small problems during transport. Once the main package is opened, we find inside: - 1 Citrus squeezer with all its components - 1 Tray for collecting the transparent juice - 1 Tray for collecting the pulp, in black color - 1 Detailed instruction manual in many languages : ITALIAN , German, English, French and Spanish - 1 brush for thoroughly cleaning the most difficult to reach spaces Before assembling the machine it is advisable to wash the components in hot water with soap (which does not contain abrasive products) using a sponge or cloth soft to avoid scratching the components. For correct installation, we will have to make sure that the components are inserted in the right direction, fitting them perfectly into the dedicated area. The passages are carried out from the bottom to the top, therefore first of all we will have to assemble the Glass (with the 2 outlets dedicated to the juice and the pulp) - We will have to insert the filter support inside it - Then we insert the filter (and we make it match with a wheel present in the base) - At that point it is time for the Auger (a little more complicated to insert) - To conclude, we place the funnel and close everything. HOW IT WORKS: Once we have carried out the first steps, and we have assembled everything, we will be ready to go and centrifuge many types of fruit and vegetables. To ensure that the machine does not suffer damage or blocks, we will have to remove the stone from the fruit, the peel from citrus fruits, melons, pineapples and mangoes. At this point, after a thorough washing we can go and cut the fruit into small pieces, so as to be able to insert it inside the funnel without problems. We will now be ready to operate the machine, and by inserting our fruit or vegetables, in a few seconds the juice will start flowing in the dedicated area, while the pulp in the other. WHAT WE CAN CENTRIFUGATE: With this type of machine it is possible to extract the juice from all types of fruit and vegetables (preferably in season and which do not contain starch). In fact, we can also insert inside: Celery - Carrots - Spinach - Apples - Pears - Cucumbers - Tomatoes - Bananas etc. As far as leafy vegetables are concerned, it is recommended to mix them with other products that contain more juice. vitamins, it will be the ideal machine, a juice extractor in the morning at breakfast will certainly give you much more energy than a fruit juice at the bar. - The assembly of the components is very simple and fast, the first few times it will be a little awkward, but once you get the hang of it it will be a moment to assemble it - Unlike other similar machines, it is possible to insert almost all types of fruit and vegetables, to create truly special mix of tastes never tried before. - It has a very high level of safety, if assembled correctly it will be impossible to insert your hands inside (including children) and the engine will not start until every single part is perfectly closed. - It extracts all the juice possible, in fact the pulp is dry and without any liquid inside - We can use the "waste" to fertilize the plants on the terrace or in the garden, so as not to throw away anything other than the peel. CONS : - It's not a real con, but, being a little too tall, in some kitchens (like mine) it's difficult to find a place for